
Concealer is one of life’s little helpers and can be a real game-changer. It can hide skin imperfections, counteract redness and brighten up the features all with just a few little slicks and swipes. We can't thank it enough! But I'm sure we can all agree that with so many different formulas and shades out there on the market, a girl can get lost in the ever-expansive makeup maze. But fear not †” as Luk Beautifood's Online Editor & Beauty Expert (not to mention concealer extraordinaire!) †” I'm dishing out some pro tips I've picked up throughout my beauty travels. Here's how to conceal confidently without worrying about harsh chemicals:
1. First, decide which consistency & texture you're after.
Choose your concealer based on what works for your skin type and concerns. If you have dry skin: Steer clear of matte formulas (as these emphasise dryness) and opt instead for hydrating liquid concealers. They're ideal for medium to full coverage and the lightweight formula makes it easy to build on. You can apply it to any part of the face and if all you want is a little coverage, use just the slightest, sheerest amount on bare skin to master a smooth and polished canvas. If you have oily skin: Avoid creamy formulas as these can clog the pores and increase oily skin's shine. Rather, try out matte or powder formulas. If you have combination skin: You can wear a range of formulas and textures, and even apply different concealers to different areas of your face. For example, if you experience an oily T-zone but dry cheeks, use a combo of two concealers to counteract these issues. If you have blemish-prone skin: Blemishes are a natural part of being human and are easier to conceal than you think! If you need to cover up scars or pimples, reach for a creamy, full coverage concealer that will help smooth out the skin's texture for the ultimate flawless finish. If you have lacklustre or mature skin: Opt for brightening concealers to impart a come-hither-glow to your features. 2. Now figure out which colour you need.
Purple: Counteracts sallow or yellowness in the skin. Purple and yellow are opposites on the colour wheel, which is why this works so well!
Yellow: Counteracts deep purple tones such as dark circles, bruises or veins. Also a great colour to use for a base on your eyelids, brow bone, or cheekbones before you apply the rest of your makeup. Say goodbye to raccoon eyes!
Green: Neutralises redness and diffuses redness from rosacea. Can also be used for spots on the skin, including blemishes, acne, windburn and even sunburn.
Pink: Brightens any dull areas of your skin and hide signs of fatigue. Use this colour corrector to give your entire face a little boost.
Orange/Salmon: Brightens the eye area with peachy-pink tones and gives skin a radiant appearance.
Neutral: To cover any basic imperfections or small blemishes, use a neutral concealer in a shade that matches your skin tone.
2. Now figure out which colour you need.
Purple: Counteracts sallow or yellowness in the skin. Purple and yellow are opposites on the colour wheel, which is why this works so well!
Yellow: Counteracts deep purple tones such as dark circles, bruises or veins. Also a great colour to use for a base on your eyelids, brow bone, or cheekbones before you apply the rest of your makeup. Say goodbye to raccoon eyes!
Green: Neutralises redness and diffuses redness from rosacea. Can also be used for spots on the skin, including blemishes, acne, windburn and even sunburn.
Pink: Brightens any dull areas of your skin and hide signs of fatigue. Use this colour corrector to give your entire face a little boost.
Orange/Salmon: Brightens the eye area with peachy-pink tones and gives skin a radiant appearance.
Neutral: To cover any basic imperfections or small blemishes, use a neutral concealer in a shade that matches your skin tone.
 3. Here's how to apply your camouflage.
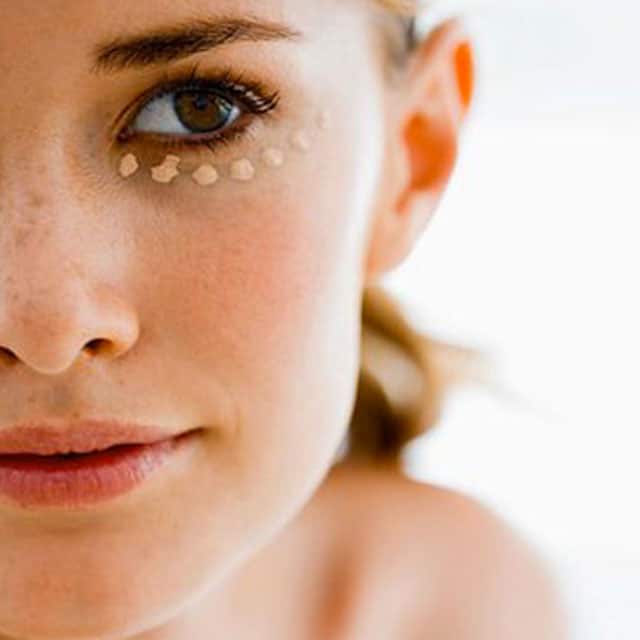
If you're concealing under eye circles... Be sure to select a shade of concealer that is no more than one or two shades lighter than your natural skin tone. To lift your features and conceal eye shadows, apply it in an upside-down triangle underneath the eyes and against the sides of the nose and blend with your fingertips in a tapping motion. The heat from your fingers will help the product absorb better and melt right in. Under-eye circles be gone!
If you're concealing discoloured areas... Pat the colour on with your ring finger over discolouration on bare skin. Blend outward, and use a damp sponge to blend the edges seamlessly into the skin. Next, apply a sheer foundation over your entire face to lock it in place and set it with loose powder. This should cut down discoloration at least by half, if not more!
If you're concealing pimples... If you are breaking out, you may choose to apply your concealer with a clean brush or cotton tip to avoid transferring bacteria from your hands over to the blemish. Use the same tapping and dabbing motions mentioned above to cover up the blemish.
5. And a few extra tips, just because..
- If your skin is dry, particularly around the eye area, prep it with a light layer of nourishing moisturiser. Allow a moment or two for it to set, then apply concealer.
3. Here's how to apply your camouflage.
If you're concealing under eye circles... Be sure to select a shade of concealer that is no more than one or two shades lighter than your natural skin tone. To lift your features and conceal eye shadows, apply it in an upside-down triangle underneath the eyes and against the sides of the nose and blend with your fingertips in a tapping motion. The heat from your fingers will help the product absorb better and melt right in. Under-eye circles be gone!
If you're concealing discoloured areas... Pat the colour on with your ring finger over discolouration on bare skin. Blend outward, and use a damp sponge to blend the edges seamlessly into the skin. Next, apply a sheer foundation over your entire face to lock it in place and set it with loose powder. This should cut down discoloration at least by half, if not more!
If you're concealing pimples... If you are breaking out, you may choose to apply your concealer with a clean brush or cotton tip to avoid transferring bacteria from your hands over to the blemish. Use the same tapping and dabbing motions mentioned above to cover up the blemish.
5. And a few extra tips, just because..
- If your skin is dry, particularly around the eye area, prep it with a light layer of nourishing moisturiser. Allow a moment or two for it to set, then apply concealer.
- When applying concealer to the undereye area, try adding a brightening concealer on top for a light-reflective finish that further disguises shadowed areas
- Finish by setting concealer with a light dusting of loose or pressed powder. A concealer with a matte finish doesn't need to be set with powder because that may make it look or feel too dry.
- A great trick is to draw short lines, like the rays of the sun, from the under eye area to the tops of cheekbones. This brightens dark circles and highlights at the same time.
- Always apply your foundation first, then concealer to ensure the concealer does not get rubbed off by your base.
- To make your lipstick last longer, dab on some concealer to your pour beforehand. It'll act as the perfect base!
- Remember, a little goes a long way!

Kristina xo
Images courtesy of Dollar Photo Club
What is your favourite non-toxic concealer to use? Do you rely on concealer as an everyday makeup staple? Leave a comment!